Facebook
 Google
 GitHub
 Linkedin
LabVIEW Loops Explained
In programming languages, loops control processes and instrumentation. Learn how to set up while loops, for loops, and other types of loops in LabVIEW.
Like every other programming language, NI LabVIEW uses loop structures to control the flow of the program. Loops are used to repeat a section of code until a condition is met or to repeat a section of code a certain number of times.
Loops are programming structures, so they only exist in the block diagram.
To place a loop of any kind, select it from the functions palette. Click and hold in the block diagram where the top left corner of the loop will be, then drag the cursor toward the lower right to determine the size of the loop. Release when the loop is the size needed. The loop size can always be changed later by clicking and dragging on the sides to extend it in any direction.
Suppose the programmer needs to know which loop number the program is currently running. In that case, they can wire the “iterations” terminal, typically in the lower left-hand corner, to a digital display or use it in the code. This is useful for debugging, determining how long a loop has been running, and accessing elements in arrays and other applications.
While Loops
While loops are used when the programmer does not know how many times the loop must execute. These loops are used when the program must wait for input from an operator or machine feedback or collect data with little human intervention. They are also used for watch dogs to constantly check for errors or safety issues.
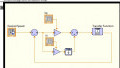
The while loop has a conditional terminal, typically in the lower right-hand corner of the loop. The default option shows a small, red octagon. This conditional terminal must receive boolean input from either digital logic in the block diagram, a stop button on the front panel, or some other block of code. The most simple while loop has a stop button as an input to the conditional terminal, such that the code will run until the operator presses the stop button.
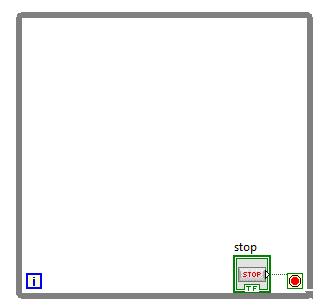
Figure 1. A while loop with a stop button wired to the conditional terminal. The loop will execute continuously until the stop button is pressed.
Alternatively, the while loop can be fitted with a green loop arrow instead of a red octagon. The difference is that the red octagon means the loop will execute until it receives a true input, but the green arrow will execute until it receives a false input. To toggle between these options, simply click on the conditional terminal.

Figure 2. Alternate while loop conditional terminal.
One programming consideration with while loops is that they will always run at least one time. The loop executes its contents and then performs the check to see if the condition is met. For most applications, this is fine, but not for every circumstance.
For example, suppose there are six loops in series, where one loop completes, and the next loop begins. This is all contained in a much larger while loop that checks to see if the emergency stop button has been pressed. An operator runs the program, and somewhere in the second loop, they hit the emergency stop.
In this case, the program will execute each following loop at least one time before checking the emergency stop button, and the machine does not stop right away. There are better ways to handle cascaded loops, such as this, but that is beyond the scope of this article.
Timed Loops
Timed loops are a specific type of while loop that occurs at a specific time interval. This is particularly important for data collection and instrument control that require high sampling rates. While other loops can be fitted with one of the many forms of time delay available in LabVIEW, timed loops have less jitter, meaning less variation in time between loop iterations.
The timed loop is a little different in that it has more options under programmatic control. Besides adjusting the timing, the timed loop can run on a specific processor with a set priority. One approach for a processor with multiple cores is to group time-sensitive operations into one timed loop and assign them to run on a different core than the rest of the program.
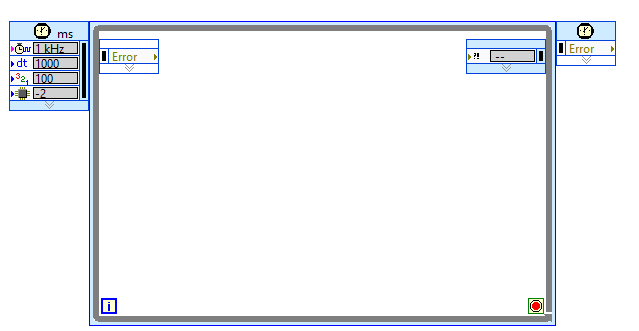
Figure 3. A LabVIEW timed loop.
Also, the loop has multiple ways to handle “missed” frames, so if a loop does not execute at the right time, the programmer can specify how to handle the next frame. It may be more important to keep the timing perfect and ignore the missing frame, or maybe the data is still collected and added later.
For Loops
For loops are used when the programmer knows how many times a loop must execute. The number of iterations can be defined during programming or specified at runtime.
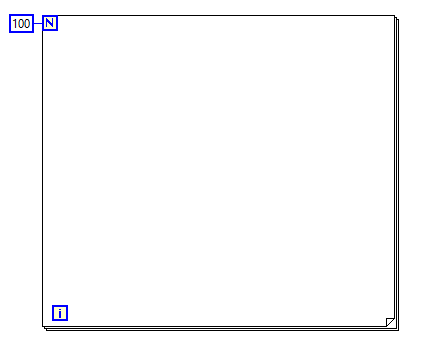
Figure 4. A for loop in LabVIEW. In the upper left-hand corner is the count terminal, and in the lower left-hand corner is the iterations terminal.
A for loop must have an input that specifies how many times the loop will execute. In LabVIEW, a “count” terminal, typically in the upper left-hand corner, receives this input. The count terminal can be wired to a constant, as shown in figure 4, or it can be wired to an integer output from some other previous piece of code. In this way, the number of loop iterations can be determined while the code is executing.
Other Loops in LabVIEW
Infinite Loops
In many applications, infinite loops are undesirable. However, in instrumentation and process control, sometimes infinite loops are required. Sometimes code must run as long as the equipment is running, such as a routine that checks to see if the emergency stop button has been pressed.
Nested Loops
What about a loop inside of a loop? Most programming languages allow nested loops, and LabVIEW is no exception. Nested loops are a powerful structure for dealing with multi-dimensional arrays and matrices, where the program must process data in each position of the array or matrix before continuing to the next step.
Loops are one of the most used structures in any programming language. LabVIEW gives the programmer several options for loops and makes it easy to place code blocks inside or outside the loop.