Facebook
 Google
 GitHub
 Linkedin
Maintenance and Troubleshooting for 6-Axis Robot Arms
Across every make and model of articulated robot, certain maintenance procedures must be followed as motion occurs. Failure to do so can often result in warnings, alarms, and even failure.
When dealing with any type of 6-axis robot, optimal maintenance through regular checks and scheduled procedures is imperative. This discussion will outline essential checks and maintenance practices and address various scenarios and troubleshooting procedures.
In this article, we will use specific references from FANUC maintenance procedures, but the same general concepts will apply to robots of nearly any brand and model.
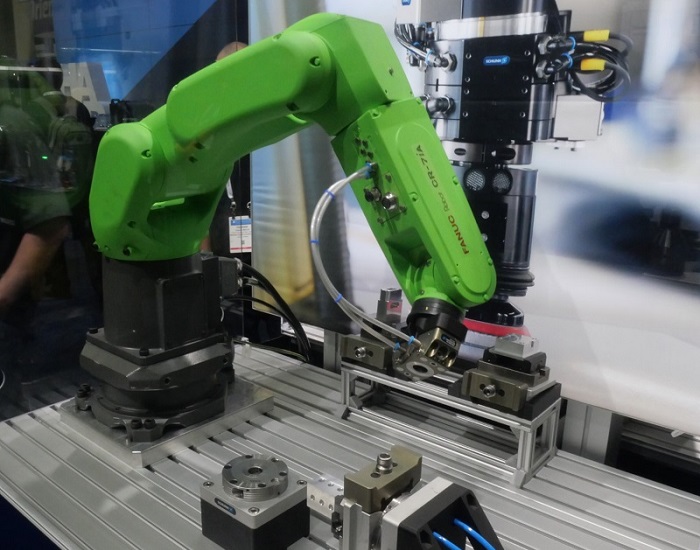
Figure 1. The CR-7iA, a member of FANUC’s original collaborative robot series. Image used courtesy of the Control Automation engineering team
Robot Maintenance
We’ll begin by noting the information below to provide a baseline for this article section: the provided time intervals assume the robot is used for a maximum of 3840 hours a year. The recommended maintenance frequencies must be adjusted if the robot's usage exceeds 3840 hours annually. For example, suppose the robot is used for 7680 hours yearly with a suggested maintenance interval of 3 years or 11520 hours. In that case, the maintenance frequency should be recalculated as follows: guideline-rated maintenance interval / (actual hours per year / guideline-rated hours per year). In this example, 3 years / (7680 hrs/3840 hrs) = perform maintenance every 1.5 years.
We will focus on the essential maintenance checks and procedures to ensure the robot's continuous optimal performance. While all maintenance checks and procedures play a crucial role, it is imperative to prioritize the primary checks and performances to keep your robot in working condition.
Encoder Battery Replacement
Battery replacement assumes critical importance when considering maintenance procedures. This is primarily because the backup batteries are responsible for retaining the positional data of each axis. Failure to promptly replace the batteries or improper execution of the replacement process may result in losing all existing positional data within the 6-axis robot.
The heart of the robot's operation lies in its batteries. These must be replaced annually or after 3840 hours of operation, whichever occurs first. It is crucial to ensure the controller remains powered on during battery replacement. If the power is turned off, all current positional data will be lost, requiring the robot to be remastered.
Replacing the robot's batteries is a straightforward process. First, press the EMERGENCY STOP button to halt all robot motion. Then, remove the battery case cap positioned below the first joint (J1) on the robot base. Take out the old batteries, insert the new batteries in the same orientation, and then close the battery case cap. It's a simple task that ensures the robot's optimal performance.
Replacing Grease and Oil
It's a common misconception that the grease and oil within the drive mechanisms for the robot's joints can be kept the same. However, to ensure the robot operates optimally, performing this maintenance task every three years (or 11520) operating hours is crucial, whichever comes first. It is essential to consult the robot's manual for the specific procedures when performing this maintenance task to ensure the correct and safe procedure.
It's critical to note that this is not a uniform procedure, as each robot has different seal locations, specified types of grease, and varying amounts that need to be applied per axis. Failure to follow the robot's manual could lead to abnormal robot operation, reducing efficiency and potentially causing workplace accidents.
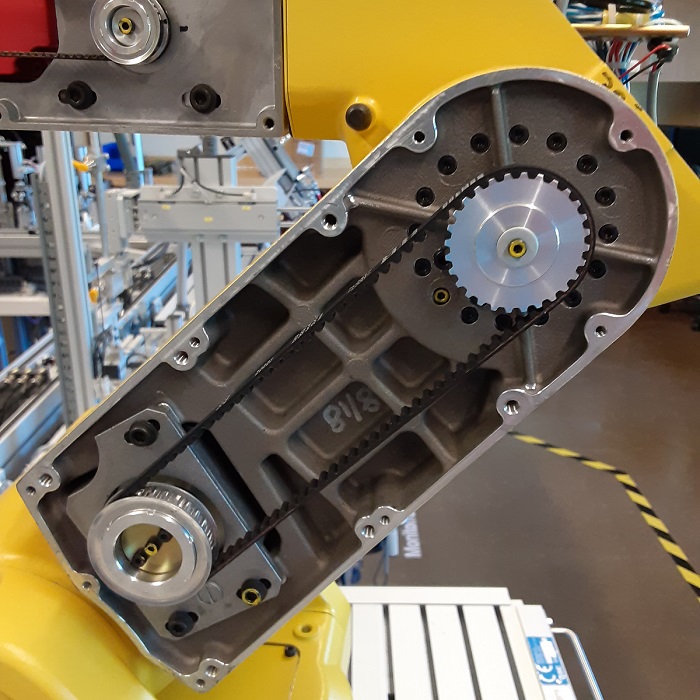
Figure 2. The drive mechanism located inside the third joint of a robot arm. Image used courtesy of the Control Automation engineering team
Troubleshooting
Several factors may contribute to various operational problems, and while not all of them are related to maintenance schedules, they can have a surprising impact on various aspects of motion.
Mispositioning
This issue occurs when the robot operates at positions other than initially taught, and the repeatability falls outside tolerances. The potential causes of this issue include a failure in the drive mechanism, instability in repeatability due to a collision causing excessive load, which may lead to the base slipping, or a faulty pulse coder.
When addressing these issues, ensure that all mounting bolts are tightened and that the robot base does not slip during jogging. Then, reteach the desired points and check if the robot is fixed and within tolerance. If this process does not resolve the issue, proceed to inspect the drive mechanism and pulse coder. If the problem originates from the pulse coder, the robot will likely exhibit abnormal vibrations, and the motor of the affected axis should be replaced. It is advisable to seek assistance from your local FANUC (or other brand) representative when replacing drive components, as incorrect installation could lead to the failure of the robot.
Motor Overheating
Motor overheating is common among 6-axis robots. This problem often occurs when users input incorrect load settings, such as payloads. This leads to abnormal acceleration and deceleration, causing the average current to rise and the motor overheating.
Another primary factor that can lead to motor overheating is high ambient temperatures. To effectively mitigate this issue, it is crucial to lower the ambient temperature and guarantee that the motor's environment is adequately ventilated to allow for efficient heat dissipation. Furthermore, if there is a nearby heat source, it is advisable to install shielding to safeguard the motor from heat radiation.

Figure 3. Harsh environments, welding included, can cause overheating if not properly mitigated. Image used courtesy of Adobe Stock
Excess Alarm
A "move error excess" alarm (which takes the form of a SRVO error in the FANUC environment) should appear on the teach pendant when dealing with an excess alarm.
This alarm often occurs when robots are used in a low-temperature environment near 0 degrees Celsius or when the robot hasn’t been operated for some time in a similarly cold environment (storage). At the other extreme, very high temperatures can accelerate grease wear and drying. In these cases, the robot’s joints may resist movements when starting a program. Collaborative robots, since their safety systems rely heavily on precise payload motion calculations, can be more prone to this problem.
A simple fix is usually effective in resolving this error. Sometimes, several minutes of a warm-up or low-speed operation can rectify the issue. If this initial fix is unsuccessful, it is recommended to consider examining the robot’s payloads, adjusting speed or acceleration settings, or verifying that the robot is supplied with the correct rated voltage.
Preventing Problems with Maintenance
Every machine requires some kind of attention at regular intervals, not just robots. However, as robots become more integrated with safety features, even small discrepancies in motion can prevent operation. Explorations into predictive maintenance may even help to determine when higher maintenance frequencies may be needed to prevent downtime, while not becoming a burden on maintenance staff.