 Facebook
 Google
 GitHub
 Linkedin
PLC Program Commands: Arrays Part 3, Searching and Sorting
Learn how to streamline your ladder logic by searching and sorting arrays with the FSC and SRT instructions in the Rockwell (Allen-Bradley) Studio 5000 programming software.
See our previous articles on Array Functions:
PLC Program Commands: Performing Array Functions Part 1
PLC Program Commands: Performing Array Functions Part 2
If you’ve been following this series on Rockwell (Allen-Bradley) logic instructions, you’ve likely seen some pretty complex instructions get broken down and explained. The past few articles have covered working with arrays and explained some of the fundamental concepts including the usage of multi-dimensional arrays. If you haven’t got a clear understanding of multi-dimensional arrays yet, you’ll want to look at our previous article.
If you’re still with me, I’ll assume you’ve got the basics down and are ready to jump into searching, comparing, and sorting the data inside arrays.
Using the FSC (File Search and Compare) Instruction in Studio 5000
The FSC instruction is designed to allow you to streamline comparisons so that you can use one instruction and apply the same function to every entry of an array.
I try to always present a real-world application to instructions, so let’s start there. Imagine you are working on a machine that runs batches of 800 widgets. If too many widgets are under 5 oz, then the batch needs to get flagged with the specific widgets returned for rerun.
We have an array that contains the weight of every widget in the batch. The array is 800 elements long. We need to find out how many entries are under 5 and notate which ones they are. Let’s examine how we can use the FSC instruction to do this.

Figure 1. Using an FSC instruction to find out how many entries contain a value less than 5.
The first tag in the list is the Control tag, and it needs to be discussed in greater depth. This instruction uses a few more features of the Control tag than previous instructions we’ve covered in previous articles. Not only does the Control define the Length and Position, but also the Found (FD), Inhibit (IN), and Done (DN) bits.
Another thing you might not see often is the Mode entry. The Mode can be either ALL or INC or a specific number. The Mode tells the instruction how many entries to evaluate per scan of the controller. If you say ALL, then it will do all. If we were scanning thousands of entries, this could bring down our controller and cause problems. Incremental would do one evaluation per scan. This would be easier on the controller, but might cause our instruction to execute too slowly. We can also set a specific number, say 100 entries per scan, to find the balance point.
How does the FSC Command Work?
The way the FSC works is by starting at position 0 of the array and evaluating it based on the expression we give it. Our expression in the logic above shows that we are evaluating the FSCArray with the Position Control as the pointer. The FSC evaluates the expression and then decides if the expression is True or False. If the expression is True, the Found bit turns on, the Inhibit turns on to stop the FSC from continuing, and the Position shows the position where it stopped and found the desired solution.
When making an expression for the FSC instruction to evaluate, it is important to remember that you are using comparisons, that is, conditional statements that will yield ‘true’ or ‘false’. This is not like a compute instruction where you make a formula. You can create expressions to evaluate if something is greater than, less than, equal to, or a combination of these. However, just because you aren’t using a compute instruction, that doesn’t mean you can’t have math inside your comparison. You can also use AND, OR, XOR, NOT and other commands. For an exhaustive list of the functions you can use, check out the help files for the FSC instruction in Studio 5000, there are a lot!
Now let’s see what it looks like when it finds something.
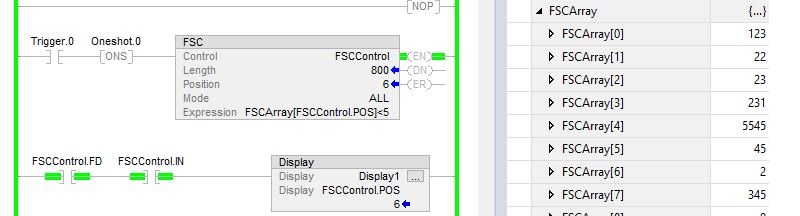
Figure 2. The FSC instruction comparing data in arrays.
In the array on the right in Figure 2, you can see the 7th element (FSCArray[6]) would be true when evaluated according to the expression in our instruction. When we hit the trigger, the controller begins evaluating. The next thing we see is the instruction stop at [6] where it Inhibits and sets the Found bit to true.
To apply this to our example in Figure 2, we could tie the Found bit to a counter to check how many failures we have and then store the Position number in another array for later use during the rerun process.
To go through and check every single element in this array would take a massive ball of code that would be ugly and potentially have bugs or problems in it! The FSC instruction condenses and packages it up into one, robust function. While you may not encounter this instruction very often, it is worth its weight in gold when you do need it.
Using the SRT (Sort) Instruction in Studio 5000
Now let’s pivot to something a little easier. The SRT instruction doesn’t require nearly as much work as the FSC. Its operation is fairly simple—take an array and sort the contents from smallest to largest.
There are four different tags that need to be defined for the SRT instruction: the Array, which is the array we want to sort, the Dimension to Vary, which tells the instruction if we want to sort the rows or columns of a multi-dimensional array, the Control, and the Length. You’ll notice there are five places you can enter data on the instruction, but I only listed four. The fifth is called the Position. It is defined by the Control tag and changes as the instruction gets executed. You are not going to place anything in this tag position.
Let’s take a look at this instruction in action.

Figure 3. Four different tags (Array, Dimension to Vary, Control, and Length) need to be defined for the SRT instruction.
How Does the SRT Instruction Work?
In Figure 3 above, we have an instruction set up on the left with its corresponding data on the right. Let’s trigger the instruction and see what happens.

Figure 4. After triggering the instruction, the data from Figure 3 is placed in numerical order from 1 to 5.
When we triggered the instruction, it took all the data and placed it in perfect order from 1 to 5. This instruction is very simple to use but provides you with an easy bypass to a lot of complex code. Imagine trying to sort an array that is 60 elements long with rung logic! That’s not how I want to spend my work day.
FSC and SRT Instructions
These instructions are two of the many functions the Studio 5000 can use to help you work faster and more efficiently with clear and concise code. Use these instructions to your advantage and never stop learning about them.
Want to test your knowledge of PLCs? You think you N.O. a lot about ladder logic? Are you a normally-open or normally-closed minded engineer?
Check out our PLC Programming worksheet!


” Imagine trying to sort an array that is 60 elements long with rung logic! “
That is what ST is for.